10 Q&As That Explain Everything You Need to Know About Engine Belts

When it comes to keeping your vehicle running smoothly, few parts work harder behind the scenes than your engine belts. Whether it’s the serpentine belt, timing belt, or accessory drive belts, these unsung heroes power critical components that keep you safely on the road. To help clear up the mystery, here are 10 common Q&As about engine belts every driver should know.

1. What do engine belts actually do?

Engine belts transfer power from the engine’s crankshaft to various components like the alternator, water pump, power steering pump, and air conditioning compressor. Without them, many essential systems in your vehicle simply wouldn’t work.

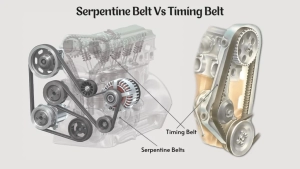
2. What’s the difference between a serpentine belt and a timing belt?

Serpentine Belt: Runs multiple accessories at once (alternator, A/C, etc.).
Timing Belt: Synchronizes the crankshaft and camshaft so your engine’s valves open and close at the right time.

Both are critical—but a timing belt failure can be catastrophic for your engine.

3. How long do belts usually last?

Serpentine belts: 80,000–160,000 km (50,000–100,000 miles)

Timing belts: 95,000–160,000 km (60,000–100,000 miles) or around 5–7 years
Always check your owner’s manual, as some vehicles have shorter or longer service intervals.

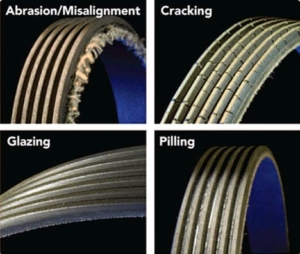
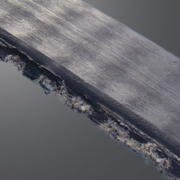
4. What are signs my serpentine belt is failing?

Watch (and listen) for:

Squealing or chirping noises
Cracks, fraying, or glazing on the belt
Power steering, alternator, or A/C not working properly
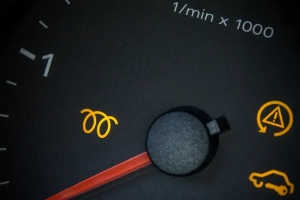
Dashboard warning lights

5. What happens if my timing belt breaks?

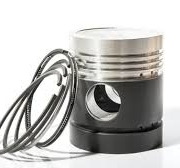
Bad news. If your car has an “interference engine,” a snapped timing belt can cause the pistons and valves to collide, leading to thousands in repair costs. Even in non-interference engines, your car will stop running instantly.

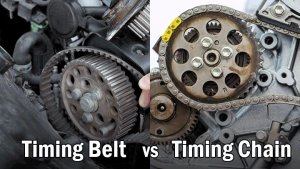
6. Are timing chains the same as belts?

Nope! A timing chain is metal and typically lasts much longer than a belt—often the lifetime of the engine. However, chains can stretch or wear, so they still need inspection and sometimes replacement.

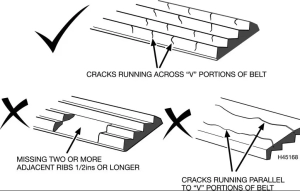
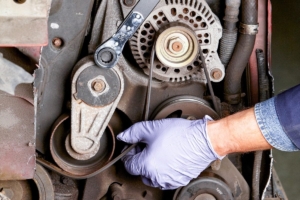
7. How do mechanics check belt condition?

During regular inspections, a technician will:

Look for cracks, splits, or missing chunks
Measure belt tension and alignment
Listen for abnormal noises
Inspect pulleys and tensioners (since these can fail too)

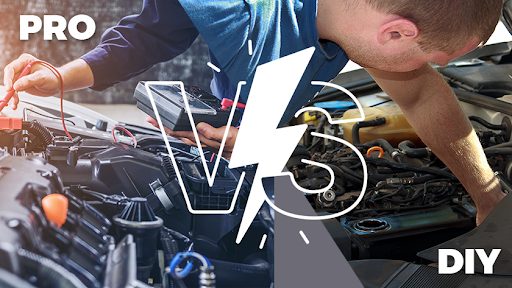
8. Can I replace an engine belt myself?

A serpentine belt? Maybe, if you’re handy with tools and follow a diagram.
A timing belt? Not recommended. It usually requires disassembling parts of the engine, lining up timing marks, and resetting components—one wrong move can ruin your engine.

9. What happens if I ignore a worn-out belt?

At best: your A/C stops working or your alternator quits charging.
At worst: your engine overheats, you lose steering assist, or the timing belt snaps and causes major engine damage. In short—don’t ignore it.

10. How much does it cost to replace a belt?

Serpentine belt replacement: Usually between $300–$500 (parts & labor)

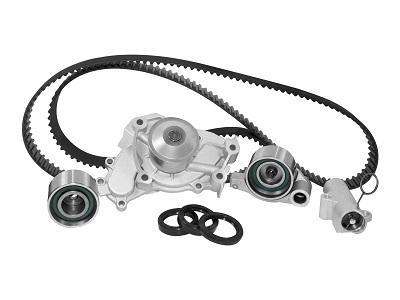
Timing belt replacement: $1000–$3,000+ depending on the vehicle, since it’s labor-intensive and often done with water pump replacement.

Final Thoughts

Engine belts might not be flashy, but they’re some of the hardest-working parts in your vehicle. Staying on top of inspections and replacement intervals can save you from breakdowns—and expensive repairs.

👉 If you’re noticing squeals, cracks, or it’s been a while since your last replacement, book an inspection with Those Guys Garage today. We’ll make sure your belts (and the components they run) are ready for the road.


Understanding Your Car’s Warning Lights – A Quick Reference Guide

We’ve all been there—you’re cruising down the road, music on, coffee in hand—and suddenly a strange little light flicker on your dashboard. Cue the panic. Do you need to pull over right now? Can it wait until tomorrow? Or is it just your car’s way of saying “Hey, don’t forget me”?

Knowing what your car’s warning lights mean can save you from expensive repairs, unsafe driving conditions, or even a roadside breakdown. Here’s a quick reference guide to help you decode those mysterious symbols.

Common Dashboard Warning Lights (and What They Mean)

Check Engine Light (CEL)

What it looks like: An outline of an engine (sometimes with the word “Check”).

What it means: Could be minor (like a loose gas cap) or serious (engine misfire, emissions issue). Don’t ignore it—get a diagnostic scan.

Battery/Charging System Light

What it looks like: A battery symbol.

What it means: Alternator problem, weak battery, or bad wiring. If this stays on, your car may soon lose electrical power.

Oil Pressure Light

What it looks like: An oil can dripping a drop.

What it means: Low oil pressure—could mean low oil level or a major lubrication issue. Pull over ASAP and check your oil.

Brake System Warning Light

What it looks like: Circle with an exclamation mark or the word “BRAKE.”

What it means: Could be low brake fluid, worn pads, or parking brake still engaged. Don’t mess with brakes—get them checked immediately.

ABS Light

What it looks like: Circle with “ABS” inside.

What it means: Anti-lock brake system issue. Regular brakes will still work, but ABS safety features may not.

Tire Pressure Monitoring System (TPMS)

What it looks like: Exclamation mark inside a tire.

What it means: One or more tires are low on air. Inflate to the recommended pressure (check your door sticker).

Coolant Temperature Light

What it looks like: A thermometer in waves of liquid.

What it means: Engine is overheating. Pull over, turn off the engine, and let it cool. Continuing to drive could cause major engine damage.

Airbag Warning Light

What it looks like: A person with a circle in front of them.

What it means: Airbag system malfunction. If it stays on, your airbags might not deploy in an accident.


What to Do When a Warning Light Appears

Flashing light? That’s urgent. Pull over safely.

Solid light? Still important, but you may have time to get it checked soon.

Red lights = Danger. Yellow/orange lights = Caution.

Final Thoughts

Your dashboard isn’t trying to annoy you—it’s your car’s way of talking to you. By learning these common warning lights, you’ll know when it’s safe to keep driving, when to schedule a repair, and when to pull over immediately.

Save this guide, share it with a friend, and keep your car happy (and safe)!


The Pros and Cons of DIY Auto Repairs vs. Professional Services

When your vehicle needs maintenance or repair, you’re often faced with a big question:

Should I try fixing this myself or take it to a professional mechanic?

While the rise of online tutorials and affordable tools has made DIY car repairs more accessible than ever, professional auto services still offer unmatched expertise and convenience.

Here’s a breakdown of the pros and cons of each approach to help you make the best choice for your situation.

DIY Auto Repairs: The Pros and Cons

– The Pros

1. Cost Savings

DIY repairs can be significantly cheaper since you’re avoiding labor costs. For basic maintenance tasks like oil changes, brake pad replacements, or air filter swaps, doing it yourself can save you hundreds over time.

2. Learning Opportunity

Working on your vehicle can be a great way to understand how it works. Over time, you’ll build valuable knowledge that may help you handle roadside emergencies or detect problems early.

3. Convenience (Sometimes)

If you have the right tools and knowledge, you can tackle minor issues on your own schedule without waiting for shop appointments.

❌ – The Cons

1. Risk of Mistakes

Without the proper training, even small mistakes—like over-tightening a bolt or misdiagnosing an issue—can lead to bigger problems down the road.

2. Limited Tools & Equipment

Many repairs require specialized tools or diagnostic equipment most DIYers don’t have. That limits the scope of what you can safely and effectively do.

3. Time-Consuming

Researching how to do a job and then completing it can take much longer than expected—especially if it’s your first time doing it.

Professional Auto Repairs: The Pros and Cons

– The Pros

1. Expertise & Experience

Certified mechanics bring years of training and real-world experience to the job. They can diagnose and fix problems more accurately and efficiently than most DIYers.

2. Advanced Tools & Technology

Professional repair shops have access to high-end diagnostic tools and equipment that ensure precise service—especially with newer vehicles loaded with technology.

3. Warranty & Peace of Mind

Work done by professionals often comes with warranties, giving you peace of mind that the job was done right—or will be corrected if not.

4. Time Savings

Leave the hard work to the pros and save yourself hours of time and hassle, especially for complex or critical repairs.

❌ – The Cons

1. Higher Cost

Labor costs and shop fees can add up, especially for complex jobs. However, the value of professional work often outweighs the initial expense.

2. Less Control Over Timeline

You might need to schedule an appointment or leave your vehicle at the shop for a day or two, which may not be ideal for urgent needs.

When to DIY and When to Call the Pros

DIY might be possible with:

Oil and air filter changes
Replacing wiper blades or headlights
Battery swaps
Simple cosmetic fixes

Definitely go with the pros for:

Brake system repairs
Engine diagnostics
Transmission issues
Suspension or steering problems
Electrical system faults

Final Thoughts

While DIY repairs can save money and be rewarding, they come with risks if you’re not fully prepared. For anything beyond basic maintenance, it’s usually smarter—and safer—to trust experienced technicians. At Those Guys Garage, we’re here to handle the tough jobs with skill, precision, and care. Whether you’ve tried it yourself or want to leave it to the experts from the start, we’re just a call or visit away.

Book an appointment today!


5 Common Myths About Auto Repair That Are Costing You Money

When it comes to auto repair, misinformation spreads faster than a rumor at a family barbecue. Unfortunately, believing some of these myths doesn’t just leave you misinformed—it can leave you with a lighter wallet and a heavier repair bill down the road. Let’s bust five of the most common myths we hear in the shop and set the record straight.

“If It Ain’t Broke, Don’t Fix It”

This one’s a classic. Many drivers believe that as long as their vehicle isn’t making weird noises or showing warning lights, everything’s fine. The truth? Cars often give no obvious symptoms until it’s too late.

Example: Skipping routine oil changes might not show immediate issues, but sludge buildup can ruin an engine over time. A $70 oil change is a lot cheaper than a $7,000 engine replacement.

👉 Reality check: Preventive maintenance is cheaper and smarter than waiting until something breaks.

“Dealerships Are the Only Place for Quality Repairs”

Some drivers think taking their car anywhere but the dealership voids the warranty or means lower quality repairs. That’s just not true.

Example: A customer once told us they were quoted nearly double at their dealership for brake work. We used the same high-quality parts, did the job at a fraction of the cost, and their warranty remained untouched.

👉 Reality check: Independent shops (like ours!) often provide the same or better service, with personalized attention and competitive pricing.

“Premium Fuel Will Make My Car Run Better”

Unless your owner’s manual specifically calls for premium fuel, filling up with the expensive stuff is just draining your wallet—not improving performance.

Example: A driver came in convinced their car would last longer on premium gas. We showed them that their car was designed for regular, and the extra cost over time was adding up to hundreds of dollars a year with zero benefit.

👉 Reality check: Use the fuel your manufacturer recommends. Nothing more, nothing less.

“You Can Diagnose Everything With Google or a Phone Call”

We love a good DIY spirit, but trying to diagnose your vehicle by typing symptoms into Google or describing a noise over the phone is like calling a doctor and saying, “My stomach hurts, what surgery do I need?”

Example: A customer once told us their “brakes were bad” because of a squealing noise. Turned out it was just a rock caught in the rotor shield—a $0 fix instead of a $600 job they were bracing for.

👉 Reality check: A proper in-person inspection saves you from misdiagnosis and wasted money.

“All Mechanics Are Out to Rip You Off”

We get it—auto repair has a bad rep thanks to a few shady shops. But most mechanics are here to keep you safe on the road, not drain your wallet.

Example: We had a customer convinced they needed a new transmission after reading horror stories online. After inspection, all they needed was a fluid change. They left relieved and a lot richer.

👉 Reality check: A trustworthy shop should explain what’s wrong, show you the issue, and give you options. Transparency is key.

Final Thoughts

Believing auto repair myths can lead to unnecessary costs, skipped maintenance, or expensive repairs that could’ve been avoided. The best way to protect your wallet (and your car) is to rely on regular maintenance, professional inspections, and advice from people who know your vehicle inside and out.

Need honest advice and quality repairs? Stop by Those Guys Garage—we’ll keep your car running smoothly without the myths, gimmicks, or unnecessary upsells.


Rust Prevention Strategies

Keeping Your Car’s Body Intact

Rust might be nature’s way of reclaiming metal, but for car owners, it’s an expensive, unsightly, and damaging problem. Whether you’re driving through salted winter roads or living in a humid coastal climate, rust can creep in and compromise your car’s appearance and structure. The good news? With the right strategies, you can prevent rust and protect your vehicle for years to come.


1. Wash Your Car Regularly (Especially in Winter)

Salt, grime, and moisture are rust’s best friends. Washing your car regularly, particularly the undercarriage, helps remove corrosive materials that cling to your vehicle.

Tip: In winter, aim to wash your car every 1–2 weeks, especially after snowstorms or driving on salted roads.

2. Don’t Forget the Undercarriage

The underside of your car is most vulnerable to rust—yet often overlooked. Make sure any professional car wash includes an undercarriage rinse. If you’re DIY-ing it, invest in a pressure washer with an angled attachment.

3. Apply Rust-Proofing Treatments

Rust-proofing sprays and undercoating treatments create a barrier that repels moisture and salt. These can be applied professionally or purchased as DIY kits.

Common types:

  • Oil-based sprays: Penetrate seams and joints.
  • Rubberized undercoating: Offers tough protection, ideal for exposed underbodies.
4. Inspect Drain Holes and Seals

Drain holes are found in doors, rockers, and trunk areas to let moisture escape. If these clog up, water can pool and promote rust.

What to do:
Use compressed air or a soft brush to clear debris. Also check rubber seals around windows and doors to prevent leaks.

5. Keep an Eye Out for Paint Chips and Scratches

Chipped paint exposes bare metal, which can quickly rust—especially in wet conditions.

Fix it fast:
Use touch-up paint to seal small chips and scratches before they spread. Many kits are vehicle-specific and easy to apply at home.

6. Store It Right

Parking indoors, especially in a dry, climate-controlled garage, significantly reduces rust risks.

Bonus tip:
Avoid leaving your car in a damp garage with snow or ice on it—dry off your vehicle before storing it to avoid rust-forming condensation.

7. Use Rust Inhibitors During Maintenance

Many vehicle owners overlook preventative rust sprays during routine maintenance. Apply rust inhibitors in wheel wells, suspension components, and exposed bolts during oil changes or inspections.

8. Regular Inspections Are Key

Rust often starts small and hidden—behind wheel wells, under trim, or in door seams. Regularly inspect your vehicle for any bubbling paint or reddish-brown spots.


Don’t Let Rust Win

Rust doesn’t have to be inevitable. With consistent care and the right preventive measures, you can maintain your car’s structural integrity and resale value.

The Ultimate Checklist for Pre-Road Trip Car Maintenance

Nothing ruins the excitement of a long-awaited road trip like a breakdown on the highway. Whether you’re hitting the mountains, heading to the lake, or setting off across provinces, a little preventative maintenance goes a long way. Before loading up the snacks and playlist, use this ultimate pre-road trip checklist to make sure your vehicle is ready for the miles ahead.

✅ Fluids & Filters

Engine Oil & Filter – Check levels and condition. If it’s close to your next scheduled oil change, get it done before you go.

Coolant – Prevent overheating by ensuring your coolant is topped up and in good condition.

Transmission, Brake & Power Steering Fluids – These often get overlooked but are critical for safe driving.

Windshield Washer Fluid – A must-have for summer bugs or unexpected rain.

✅ Tires & Wheels

Tire Pressure – Inflate to manufacturer-recommended PSI for better fuel economy and safety.

Tire Tread – Worn tires reduce traction, especially in wet conditions. Use the “quarter test” to check tread depth.

Spare Tire & Tools – Ensure you have a working spare and the tools (jack, lug wrench) to change a flat.

✅ Brakes & Suspension

Brake Pads & Rotors – Listen for squeaks or grinding; it might be time for service.

Suspension & Steering – A shaky steering wheel or clunky ride could signal worn components that should be checked.

✅ Battery & Electrical System

Battery Test – Heat and long drives stress batteries; have it tested if it’s over 3 years old.

Lights & Signals – Test headlights, taillights, brake lights, and indicators. Replace any burnt-out bulbs.

Wipers – Streaky or squeaky wipers? Swap them out before you go.

✅ Comfort & Safety Essentials

Air Conditioning – Nothing worse than a road trip with no cool air.

Emergency Kit – Pack jumper cables, a flashlight, first-aid kit, roadside triangles, and basic tools.

Documents – Insurance, registration, roadside assistance numbers—all should be up to date and accessible.

✅ Final Checks Before You Hit the Road

Fuel – Don’t wait for the “low fuel” light in remote areas.

Load Distribution – Pack heavy items low and secure them to prevent shifting.

Test Drive – Take your car for a short drive to make sure everything feels and sounds right.

Why This Matters

Preventative maintenance not only saves you money but also keeps you and your passengers safe. A little time in the shop before your trip can mean smooth sailing (or driving) instead of an unwanted roadside adventure.

👉 Ready to prep for your getaway? Book your pre-trip inspection with Those Guys Garage today—we’ll make sure your vehicle is road-trip ready so you can focus on the fun.


Understanding Your Car’s AC System: How It Works & Why Maintenance Matters

There’s nothing worse than hopping into your vehicle on a scorching summer day, cranking the AC dial, and being greeted with—hot air. Your car’s air conditioning (AC) system may feel like magic when it’s working, but it’s actually a carefully engineered system that needs regular care. Let’s break it down in simple terms so you’ll know what’s going on under the hood—and when to call the experts.

How Your AC System Works

Your car’s AC doesn’t just “blow cold air.” Instead, it removes heat from inside the cabin and pushes it outside, leaving you comfortable and cool. The process works through a closed-loop system of components:

Compressor – Think of it as the “heart” of the AC system. It compresses refrigerant gas and circulates it through the system.
Condenser – Acts like a radiator, releasing heat from the refrigerant to the outside air.
Receiver/Dryer or Accumulator – Removes moisture and contaminants from the refrigerant.
Expansion Valve or Orifice Tube – Regulates the flow of refrigerant into the evaporator.
Evaporator – Located inside your cabin, it absorbs heat from the air and cools it down before blowing it through your vents.

When all of these parts are working in harmony, you get that refreshing blast of cold air on demand.

Signs Your AC System Needs Attention

Like any system in your vehicle, your AC will eventually need servicing. Here are some red flags to watch for:

Blowing warm air instead of cold.
Weak airflow, even at full blast.
Strange noises when the AC is on (squealing, rattling, or clicking).
Bad odors coming from the vents (often a sign of mold or bacteria in the system).
Water pooling inside the cabin (a blocked drain tube).

Catching these symptoms early can prevent bigger—and more expensive—repairs down the road.

Why Regular AC Maintenance Matters

Your AC system isn’t just about comfort—it also plays a role in defrosting and defogging your windows, which is important for visibility and safety year-round.

Regular maintenance keeps your system efficient, extends its lifespan, and helps you avoid sudden breakdowns during the hottest days of the year. This usually includes:

Checking refrigerant levels.
Inspecting the compressor, belts, and hoses.
Cleaning or replacing cabin air filters.
Ensuring there are no leaks in the system.

DIY vs. Professional Service

While there are a few simple things you can do yourself—like replacing a cabin air filter—most AC system work requires professional tools and knowledge. Refrigerant is a pressurized chemical that needs to be handled safely and in compliance with environmental regulations.

That’s where our team comes in. At Those Guys Garage, we have the equipment and expertise to diagnose issues quickly, recharge your system properly, and get your vehicle blowing cold air again.

Final Thoughts

Understanding how your AC system works helps you spot issues before they leave you sweating in traffic. If your air conditioning isn’t keeping up, don’t tough it out—bring your vehicle to us and let’s keep you cool and comfortable all season long.

👉 Book your AC service today and breathe easier on your next drive!


The Role of Oxygen Sensors

The Role of Oxygen Sensors in Fuel Efficiency and Emissions

In the intricate ecosystem of modern vehicles, few components punch above their weight like the humble oxygen sensor. Often overlooked by the average driver, this small but critical device plays a massive role in how efficiently your car runs and how cleanly it burns fuel. As environmental regulations tighten and fuel costs climb, understanding the oxygen sensor’s function is more relevant than ever.

What Is an Oxygen Sensor?

An oxygen sensor, often referred to as an O2 sensor, is a device that measures the amount of oxygen in your car’s exhaust gases. It’s located in the exhaust manifold or along the exhaust pipe and sends real-time data to the vehicle’s Engine Control Unit (ECU).

Most modern vehicles have multiple oxygen sensors—at least one before the catalytic converter (upstream) and one after (downstream). These sensors help the ECU maintain the optimal air-fuel ratio for combustion.

How It Works

The ideal air-fuel mixture for gasoline engines is known as the stoichiometric ratio—14.7 parts air to 1 part fuel. The oxygen sensor detects whether the mixture is too rich (more fuel than air) or too lean (more air than fuel) and sends that data to the ECU.

Using this feedback, the ECU adjusts the amount of fuel injected into the engine. This continuous feedback loop is part of a system called “closed-loop operation,” which ensures the engine runs as efficiently and cleanly as possible.

Fuel Efficiency: The Economic Advantage

One of the oxygen sensor’s primary roles is helping your engine use fuel more efficiently. When the air-fuel mixture is too rich, your car consumes more fuel than necessary. When it’s too lean, performance suffers and the engine could be damaged over time.

By ensuring that the air-fuel mixture is balanced, oxygen sensors help maximize combustion efficiency, which translates directly into better fuel economy. A faulty oxygen sensor can cause fuel consumption to spike by up to 20%, which adds up quickly at the gas pump.

Emissions Control: Protecting the Environment

Oxygen sensors are also key players in reducing vehicle emissions. By keeping the combustion process in check, they help lower the production of harmful pollutants such as carbon monoxide (CO), hydrocarbons (HC), and nitrogen oxides (NOx).

In vehicles with catalytic converters, downstream O2 sensors monitor the converter’s efficiency. If the catalytic converter isn’t reducing emissions as it should, the oxygen sensor will alert the ECU, which can trigger a check engine light and prompt a diagnostic trouble code.

Signs of a Faulty Oxygen Sensor

A failing oxygen sensor can wreak havoc on your vehicle’s performance. Here are a few telltale signs:

  • Check engine light is on
  • Decreased fuel economy
  • Rough engine idle or misfires
  • Increased emissions (failed emissions test)
  • Poor acceleration

If you notice any of these symptoms, it’s wise to get your vehicle checked out promptly.

Maintenance Tips

  • Follow manufacturer recommendations: Many automakers suggest replacing oxygen sensors every 60,000 to 100,000 miles.
  • Use high-quality fuel: Poor fuel quality can shorten sensor life.
  • Address engine issues early: Misfires, oil leaks, or coolant leaks can contaminate the sensor.

Conclusion

The oxygen sensor may be small, but its impact on your vehicle’s performance, fuel economy, and environmental footprint is anything but minor. Regular maintenance and prompt attention to sensor issues can save you money and keep your car running cleaner and smoother. So next time your check engine light comes on, don’t overlook the O2 sensor—it just might be the key to getting your car back in top form.


Understanding Glow Plugs

What They Are, How They Work, and Why Your Diesel Engine Needs Them

When it comes to diesel engines, glow plugs are the unsung heroes that ensure reliable starts—especially when the mercury drops. While gas engines rely on spark plugs to ignite the air-fuel mixture, diesel engines need a different solution. That’s where glow plugs come into play.

In this blog, we’ll break down what glow plugs do, how they work, and why they’re critical for diesel performance and reliability.

What Are Glow Plugs?

Glow plugs are heating elements used in diesel engines to help start the engine—especially in cold weather. Unlike spark plugs that create a spark, glow plugs preheat the air in the combustion chamber to aid ignition. This is crucial because diesel engines ignite fuel through compression, and cold temperatures can make it harder to achieve the necessary heat for combustion.

How Do Glow Plugs Work?

Here’s a quick breakdown of the process:

Pre-Heating:
When you turn the ignition key, the glow plug system activates before the engine cranks. The glow plugs heat up quickly—typically reaching 800°C to 1,000°C within seconds.

Heating the Combustion Chamber:
The tips of the glow plugs protrude into the combustion chamber. As they heat up, they raise the air temperature in the chamber, making it easier for the diesel fuel to ignite.

Start-Up Support:
Once the chamber is warm enough, the engine begins cranking and fuel injection starts. The preheated air allows the fuel to ignite more efficiently, leading to a smoother start.

Post-Start Operation:
In many modern diesel engines, the glow plugs may remain on for a short period after start-up to reduce emissions and stabilize idle speed while the engine warms up.

Why Are Glow Plugs So Important?

Cold Weather Starts:
Diesel engines can struggle in cold temperatures because the fuel becomes thicker and harder to ignite. Glow plugs give the engine the heat boost it needs to fire up reliably.

Reduced Engine Wear:
Faster and smoother starts reduce strain on the battery, starter motor, and internal components—prolonging the life of your engine.

Lower Emissions:
By ensuring complete combustion from the get-go, glow plugs help reduce unburned fuel and white smoke during cold starts.

Improved Fuel Efficiency:
A well-functioning glow plug system means your diesel engine reaches operating temperature faster, improving fuel economy and performance.

Signs Your Glow Plugs May Need Attention

  • Trouble starting the engine, especially when it’s cold
  • Excessive white smoke from the exhaust during start-up
  • Engine misfires or rough idle after starting
  • Glow plug warning light on your dash (if equipped)

If you’re experiencing any of these symptoms, it may be time to test or replace your glow plugs.

Final Thoughts

Glow plugs might be small, but their role in diesel engine operation is anything but minor. They ensure your truck or diesel car starts reliably in all weather conditions and runs clean and smooth right from the start.

If you’re having issues with hard starts or want to prepare for colder weather, Those Guys Garage can help inspect and replace your glow plugs to keep your diesel running like a champ.

Need your glow plugs checked or replaced? Book an appointment today and keep your diesel ready for anything the road throws at it.


What Does Your Car’s Oil Actually Do?

Understanding the Lifeblood of Your Engine

When it comes to vehicle maintenance, oil changes might seem routine—but the truth is, engine oil is one of the most critical components in keeping your car running smoothly and reliably. Whether you’re driving a commuter car, a rugged truck, or a weekend cruiser, understanding what engine oil does (and why the grade matters) can go a long way in extending your vehicle’s life and performance.

What Does Engine Oil Actually Do?

Think of engine oil as your engine’s multi-tasking MVP. Here’s what it’s responsible for:

1. Lubrication

The primary job of engine oil is to reduce friction between the many fast-moving parts inside your engine. Without proper lubrication, components would grind together, generating heat, wearing out parts, and ultimately leading to engine failure.

2. Cooling

Your engine runs hot—really hot. While your cooling system handles most of the temperature control, engine oil helps absorb and dissipate some of that heat, especially from parts the coolant can’t reach

3. Cleaning

Oil picks up carbon deposits, dirt, and microscopic metal particles as it circulates through the engine. It carries these contaminants to the oil filter, keeping internal components cleaner and reducing long-term damage.

4. Sealing

Oil helps form a seal between piston rings and cylinder walls, preventing combustion gases from escaping and maintaining compression—essential for good engine performance.

5. Corrosion Protection

Modern engine oils contain additives that help prevent rust and corrosion on internal engine components, especially during cold starts or infrequent driving.

What Do Oil Grades Mean?

You’ve probably seen labels like 5W-30 or 10W-40 on oil containers or heard your mechanic mention them. But what do those numbers mean?

The grade of oil refers to its viscosity, or how thick or thin it is at certain temperatures. The Society of Automotive Engineers (SAE) developed this grading system

Breaking Down an Example: 5W-30

The first number (5W) refers to how the oil flows in cold temperatures (“W” stands for “winter”). Lower numbers mean the oil stays thinner in cold weather, which helps your engine start more easily and get lubrication faster.

The second number (30) represents the oil’s viscosity at normal operating temperatures. Higher numbers mean the oil is thicker when hot, which can be beneficial for high-performance or heavy-duty engines.

Common Grades and When They’re Used:

5W-20 / 5W-30: Common in most modern gasoline engines. Good for fuel economy and cold-weather performance.

10W-30 / 10W-40: Slightly thicker, often used in older engines or warmer climates.

0W-20: Very thin at cold temps, great for newer vehicles designed for maximum efficiency.

15W-40 / 20W-50: Typically found in diesel engines or performance vehicles that run hotter or carry heavy loads.

So… What Happens If You Use the Wrong Oil?

Using the wrong oil grade can lead to:

  • Poor cold starts or increased engine wear
  • Reduced fuel efficiency
  • Increased oil consumption or leaks
  • Potential engine damage over time

That’s why it’s always best to follow your vehicle manufacturer’s oil specifications—or talk to a trusted mechanic if you’re unsure.

Final Thoughts

Oil isn’t just “oil.” It’s a critical piece of your engine’s performance, longevity, and efficiency. Choosing the right oil grade and changing it on schedule ensures your vehicle runs its best—whether it’s -30°C in Edmonton or you’re hauling a trailer through the Rockies.

If you’re due for an oil change or have questions about which oil is best for your ride, Those Guys Garage has your back. Our experienced techs can help you choose the right oil and keep your engine humming like it should.

📆 Book your next oil change today and keep your vehicle in top shape!